Power Tools & Hardware
Great Advice: Why Use the Ingco Voltage Tester in Your Home?
Most electrical faults hide in plain sight. The Ingco Voltage Tester detects live wires without touching them — and that changes everything.

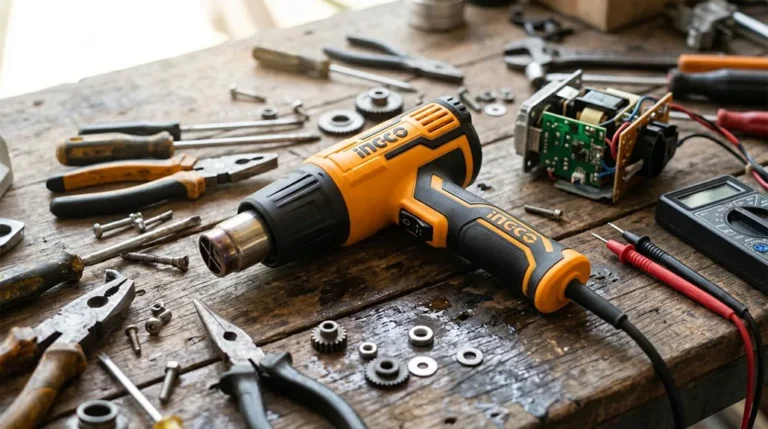
Most people toss a broken heat gun without a second thought—but what if yours just needs a two-minute fix? A faulty power cord, clogged vents, or a worn switch are usually the real reason your Ingco heat gun stopped working, and none of them require expensive repairs. Before you write it off completely, there are a few critical components worth checking. The difference between a dead tool and a working one might come down to one overlooked step.
When your Ingco heat gun won’t turn on, the problem usually comes down to one of five common causes. Knowing these causes puts you ahead of most users.
Most Ingco heat gun failures trace back to five common causes — and knowing them puts you ahead of most users.
The five most common causes are:
Each cause has a clear fix. You’ll work through them one by one in the sections below. Most repairs are straightforward and don’t require advanced technical skills. A damaged power cord can also prevent the device from turning on and should be inspected before attempting any internal repairs. Ingco also produces a range of battery and charging accessories that power cordless tools, which require separate troubleshooting steps if you are working with a battery-operated model.
Before checking internal components like fuses and switches, start with the power cord. It’s the most common cause of power failure, so inspect it first.
Look for cuts, fraying, exposed wires, or breaks along the cord’s length. Also check that the plug fits firmly into the outlet. A loose connection prevents power delivery entirely.
For a more thorough check, use a multimeter set to continuity mode:
Don’t attempt cord repairs yourself. Cord replacement is limited to qualified specialists only. If you find damage, disconnect the tool and contact a service centre immediately. If the cord tests good, the next step is to check the fuse, as a blown fuse is another common reason the heat gun won’t power on.
For businesses that rely on precise equipment daily, sourcing tools and supplies from a reputable industrial products supplier helps reduce the risk of receiving faulty components that cause these kinds of issues.
If the power cord checks out fine, the thermal cut-out is your next suspect. This safety feature shuts your heat gun off automatically when it overheats. It’s common in INGCO models and protects the tool from serious damage.
| Step | Action |
|---|---|
| 1 | Turn off and unplug the heat gun |
| 2 | Allow 15–20 minutes of cooling time |
| 3 | Inspect vents for blockages |
| 4 | Locate the reset button near the handle |
| 5 | Press or flip it per your manual |
You’re not alone in dealing with this. Most heat gun users hit this issue eventually. Following these steps delivers a great result and gets you back to work fast. If you need further guidance, IPSA-certified specialists are available to offer expert advice on your INGCO tool. To confirm whether the thermal cut-out has tripped, set your multimeter to continuity mode and test across the unit for a beep.
If the heat gun still isn’t working after resetting the thermal cut-out, you’ll need to open the casing and locate any loose wires.
Remove all screws from the casing, separate the two halves carefully, and inspect the heating element leads, coil wires, and control circuit board connections for detachment or damage. For securing any internal components or managing cable bundling during reassembly, industrial wire ties can provide a reliable and durable fastening solution.
Once you’ve reconnected any loose terminals securely and wrapped repaired spots with heat shrink tubing, reassemble the casing, restore power, and test the tool for consistent heat and airflow output. Keep in mind that thermal fuses are inexpensive and available in kits with different temperature ratings, making them a practical backup solution if loose connections aren’t the root cause of the problem.
Open the heat gun casing by removing the screws on the rear housing panel with a Phillips screwdriver, then gently pry apart the plastic clips using a flathead tool. Disconnect the power cord from the circuit board after unplugging the unit.
Trace every wire from the power inlet to the heating element terminals. Check these three common loose wire locations:
| Wire Location | Issue to Find |
|---|---|
| Heating element crimps | Disconnected or corroded |
| Thermal fuse solder joints | Vibration loosening |
| Switch terminal connections | Intermittent continuity |
Use a multimeter set to ohms to test each wire end-to-end. Expect zero ohms on intact motor circuits and infinite resistance on broken connections. Photograph every loose crimp and mark affected wires by color before proceeding. For ongoing maintenance and replacements, sourcing quality Ingco power tools and accessories from a trusted industrial supplier ensures your equipment remains reliable and fully stocked. The thermal fuse is rated to blow at 240 °C and its removal from the circuit can cause the motor to draw significantly more power than intended.
Reconnecting loose terminals restores power flow and prevents further electrical damage inside your heat gun. Insert stripped wire ends firmly into their terminal slots or posts. Press each terminal closed or crimp it securely to lock the connection in place.
Make sure no exposed wire strands touch adjacent terminals. Accidental contact between terminals causes short circuits, which will damage your heat gun further. Wrap wires tightly around riveted posts without straining the connection.
Follow these steps for a great result:
Reshaping your new connections to match the original terminal layout keeps everything organised. For demanding repair environments, using industrial-grade hygiene solutions alongside proper tools helps maintain a clean and safe workspace. You’re now one step closer to restoring full function.
With the terminals firmly reconnected, you’re ready to test your heat gun before closing the casing permanently. Don’t close the casing yet — testing first saves you from reopening it.
Power on the heat gun and observe it carefully for the first 30 seconds. You’re checking for:
Run the tool for 2-3 minutes to confirm sustained operation. If you notice smoke or burning smells, switch it off immediately. For tasks that follow your repair work, a micro check weigher can help verify consistent product weights when using your restored tools in a production or packaging environment.
A heat gun that runs cleanly through this test is a great result. You can now close the casing with confidence and return to your projects.
A worn switch on your Ingco heat gun will stop responding to position changes, preventing the tool from powering on or cycling between low and high settings.
You can identify a faulty switch by testing it with a multimeter, which will confirm whether the internal contacts are burned out or degraded.
Once you’ve confirmed the switch is the problem, you’ll remove the old switch, disconnect the wires one at a time, and install a replacement by soldering the corresponding wires to the correct terminals. When handling internal components during the repair, wearing latex disposable gloves can protect your hands from sharp edges and residual heat damage.
The switch on your Ingco heat gun can give out over time, and spotting the signs early saves you from unnecessary repairs.
You’re not alone in dealing with this — it’s one of the most common issues heat gun users face.
Look for these clear warning signs:
Test continuity across the switch terminals using a multimeter.
On your Ingco model, the switch controls three positions: 0 (OFF), I (fan only), II (heating up to 450°C), and III (heating up to 550°C).
If any position fails to respond correctly, the switch needs replacing.
For stubborn residue or buildup around the switch housing before reassembly, a heavy duty industrial cleaner can help remove grease and grime without damaging surrounding components.
Once you’ve confirmed the switch is faulty, it’s time to remove it safely. Start by unplugging the heat gun completely. Never skip this step.
Open the casing by unscrewing the vents along the back cover’s perimeter. Remove the plastic wire holder screws to keep them from interfering. Pry the case halves apart carefully, aligning the fan and heat shield grooves.
Press the side locks on the toggle switch to release it from the housing. Pull it straight out. Before disconnecting any wires, note their positions. Dark red typically signals low power, while pearlized red indicates high power.
Desolder each wire from the switch terminals. Change one wire at a time to maintain correct connections. This approach delivers a great result and keeps your repair on track. If replacement parts or tools are needed locally, Cool Pack cc offers industrial packaging and supply solutions from their Paulpietersburg location in KwaZulu-Natal.
Selecting the right replacement switch sets your repair up for success. Match the original toggle or slide type for your Ingco heat gun, like the HG200058 or UHG160058. Sourcing from Ingco’s spare parts service guarantees an exact fit.
| Step | Action |
|---|---|
| 1 | Press side locks to seat switch firmly |
| 2 | Solder wires to correct terminals |
| 3 | Secure loose switch with tape |
| 4 | Align for multi-position operation |
| 5 | Verify no plastic holder breakage |
Your new switch must support positions 0, I, II, and III. Position II delivers low heat at 450°C with 300L/min airflow. Position III reaches 550°C at 450L/min. A properly installed switch delivers a great result every time.
Sourcing replacement parts for your Ingco heat gun doesn’t have to be complicated. Several trusted options exist, both online and locally.
Start with these reliable sources:
The HGA0131 10-piece accessories set is a great result for users needing nozzles and scrapers together. Buying from verified suppliers guarantees you’re getting parts built to Ingco’s globally unified design standards.
Regular cleaning keeps your Ingco heat gun performing at its best.
Consistent cleaning habits ensure your Ingco heat gun delivers reliable, peak performance every time you need it.
Inspect your vents monthly for lint and dust accumulation.
Clear any blockages immediately to prevent overheating.
You’ll need these tools for proper vent cleaning:
Follow this cleaning process every 30 days during heavy use:
Clean vents deliver consistent heat output and reduce fire risk from lint ignition.
Inspect electrical contacts simultaneously for corrosion.
This simple routine prolongs your tool’s lifespan considerably.
Most electrical faults hide in plain sight. The Ingco Voltage Tester detects live wires without touching them — and that changes everything.
Your Ingco heat gun isn’t dead yet—a faulty cord or blocked vent could be the only thing standing between you and a working tool.
Most buyers grab the cheapest bulk hand soap and pay for it later. Here’s what separates a smart purchase from a costly mistake.

Most farmers bleed money at harvest without knowing why. Bulk woven bags fix five costly problems you never saw coming.