A dull Ingco handsaw wastes 40% of your effort. One wrong sharpening angle ruins the teeth forever. Here's how to do it right.
Most people replace a dull handsaw without a second thought. That’s a costly mistake. Your Ingco’s 65Mn steel blade can lose up to 40% cutting efficiency and still be fully restored — if you sharpen it correctly. The wrong angle or technique won’t just fail to help; it will permanently destroy the teeth. Before you waste money on a replacement, there’s a precise process that makes all the difference.
What Makes an Ingco Handsaw Worth Sharpening?
Before you invest time sharpening any handsaw, it’s worth knowing whether the blade can hold a restored edge. Ingco handsaws are built with exactly that capability in mind.
Sharpening a handsaw only pays off when the blade is built to hold that restored edge.
The blade material makes a great difference here. Ingco uses 65Mn steel, a grade that maintains performance after repeated sharpening cycles. Select models also feature Taiwan SK5 material, which delivers superior strength under heavy woodworking demands.
You’ll also benefit from the factory heat treatment applied to the teeth. This process increases edge hardness, meaning your restored blade stays sharp longer. Blade thickness is maintained at 0.9mm across models, supporting structural integrity through multiple restorations.
Key specs worth noting:
- Blade lengths: 16″ to 22″
- Tooth configuration: 7TPI for coarse cuts
- Teeth edges precision-ground on three sides
The saw is also packaged with a teeth protector included, helping preserve the sharpened edge during storage and transport between uses. For jobs requiring more aggressive material removal, pairing your handsaw work with a 115mm flap disc can help refine rough cuts on wood surfaces between sharpening sessions.
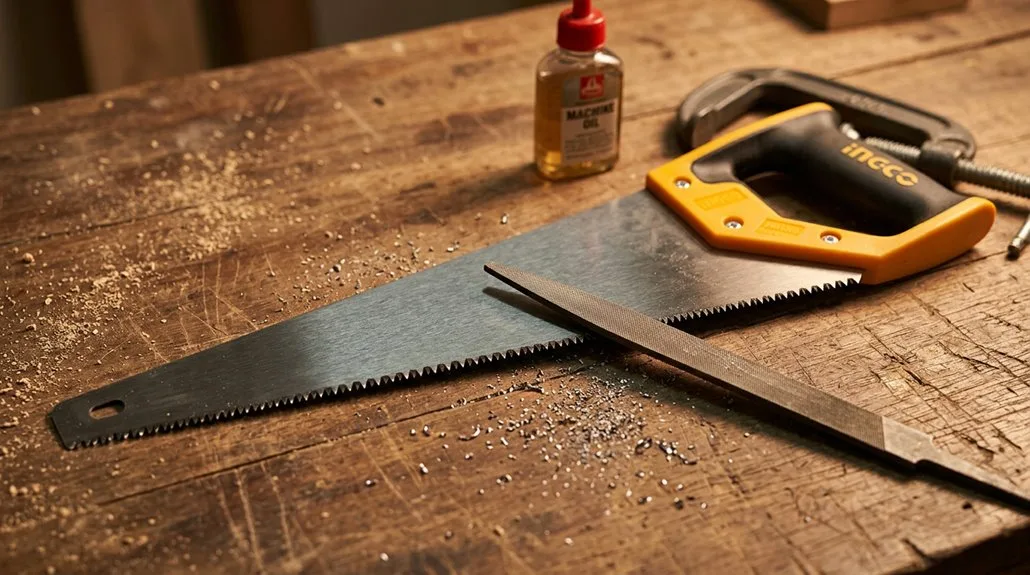
To sharpen your Ingco handsaw properly, you’ll need the right tools assembled before you start. Each item serves a specific purpose for accurate, safe sharpening.
| Tool Category |
Recommended Item |
| Filing Tool |
6–8 inch triangular file |
| Securing Device |
Bench vice with rubber jaws |
| Angle Guide |
60-degree file guide |
You’ll use a single-cut bastard file matched to the saw’s 7TPI tooth spacing. A bench vice holds the blade steady, preventing flex in the 65Mn steel. Cut-resistant gloves and safety goggles protect you during filing. Wire brush cleans debris from teeth before you begin. These tools guarantee great results every time you sharpen, keeping your Ingco handsaw performing like the rest of your trusted kit. For workshops that also handle weighing and packaging tasks, sourcing equipment from a digital and industrial scales supplier can help streamline operations alongside your sharpening workflow. The Ingco hand saw series includes models such as HHAS08450 and HHAS08500, which feature blades with a thickness of 0.9mm that requires careful filing pressure to avoid warping during sharpening.
How to Inspect Your Ingco Handsaw Teeth Before Filing
Before filing, you need to examine each tooth carefully under good lighting to spot uneven heights, missing points, or inconsistent spacing. Hold a straight edge along the blade to check alignment, and look for teeth that don’t come to a sharp point, since these indicate wear or incomplete sharpening. Ingco handsaws use a 7 TPI specification and precision-ground, triple-edge tooth geometry, so you’ll want to note any bevel angles and wear patterns that deviate from this factory standard before you begin filing. Before any filing begins, flatten and check the plate with a straight edge to confirm there are no bends or warps that could affect tooth consistency, since even slight plate distortion can cause uneven results across the full length of the blade.
Examining Tooth Condition
Inspecting your Ingco handsaw’s teeth before filing saves you time and prevents unnecessary work. Hold the blade at eye level against a light source. You’ll spot dull, chipped, or uneven teeth quickly this way.
| Condition |
What to Look For |
Action Needed |
| Dull teeth |
No sharp points visible |
File immediately |
| Chipped edges |
Broken triple-ground teeth |
Full re-toothing |
| Uneven height |
Teeth at different levels |
Level filing first |
Clean sawdust from the 0.9mm blade’s crevices before checking further. Wipe the 65Mn steel surface to expose hidden wear on heat-treated teeth. Check your 7TPI spacing for gaps or inconsistencies. Perform a test cut to confirm whether straight tracking remains accurate. You’re now ready to file with confidence. For agricultural and industrial users who rely on precision cutting tools, sourcing your Ingco saw from a trusted Ingco tools supplier ensures the blade meets verified quality standards from the outset. This saw features a 550mm cutting length, so inspect the full blade edge from heel to toe without skipping any section.
Identifying Bevel Angles
Once you’ve confirmed the tooth condition, identifying bevel angles gives you the full image you need before filing. Two key angles define your saw’s geometry: rake and fleam.
- Rake angle leans teeth back toward the handle, measuring approximately 20° from perpendicular on Western-style handsaws.
- Fleam angle appears as a visible bevel on crosscut teeth edges, alternating sides on alternate teeth; rip saw teeth show 0° fleam.
- Set pattern involves alternating sideways bends that prevent blade binding inside the kerf.
Use a bevel gauge to transfer these angles accurately before touching a file to the teeth. A combination square verifies 90° and 45° reference points.
Knowing your Ingco handsaw’s exact geometry guarantees you file correctly, producing a great result every time. Always select dry, high-quality wood for your projects, as it maintains straight cuts over time and reduces the risk of warping that can affect how your saw performs during use. For personalised guidance on Ingco tool specifications, IPSA-certified specialists are available to provide expert advice tailored to your specific needs.
Noting Wear Patterns
Every tooth on your Ingco handsaw tells a story about how the blade has been used. Check the toe end first, as it shows the most wear from primary cutting contact. You’ll notice shorter teeth there compared to those near the heel.
Look for flat spots on tooth tops. These signal over-filing on specific teeth and require jointing before reshaping. A consistent tooth height across the full blade length means even cutting performance.
Key wear indicators to check:
- Uneven tooth height along the blade
- Flat tops instead of sharp points
- Irregular bevel alternation between teeth
- Overset teeth leaning inconsistently
Identifying these patterns before filing gives you a great result. You’ll sharpen smarter, not harder, like every experienced craftsperson does. Sourcing your replacement blades and industrial-grade tools from a trusted wholesale supplier ensures you always have quality equipment ready when a saw is beyond filing.
How to Sharpen Your Ingco Handsaw Step by Step
Sharpening your Ingco handsaw takes patience, the right tools, and a structured process.
Follow these steps carefully to get a great result every time.
- Joint the teeth first: Make one or two light passes with a file from heel to toe to create small, shiny flat spots on each tooth.
- File every other tooth: Work at 15–25 degrees, removing half the flat spot per side on cross-cut teeth.
- Deburr the blade: Use a fine stone or scrap wood to remove leftover burrs after filing.
Maintaining consistent rhythm and even pressure throughout protects tooth uniformity.
Test sharpness by rubbing your finger lightly across the tops — grabbing indicates you’re done.
For securing your workpiece during sharpening, industrial wire ties can help bundle and organise cables or hoses that might otherwise interfere with your workspace setup.
How to Test Your Ingco Handsaw After Sharpening
With your Ingco handsaw filed and deburred, it’s time to put that edge to the test. Run your thumb lightly across the teeth — a sharp saw will catch your finger immediately. Feel along the handle, middle, and toe for consistent sharpness throughout.
Next, try the paper test. Hold a sheet of printer paper and slice downward with the blade. A sharp edge cuts cleanly without snagging or tearing.
Finally, make a test cut on a board using a combination square line as your guide. A properly sharpened saw tracks straight without binding in the kerf. Repeat two or three passes to confirm.
These checks give you a great result and confirm your saw’s ready to perform like the rest of the community expects. If you also work with metal cutting tasks, an Ingco angle grinder paired with a 115mm grinding disc can handle material prep that goes beyond what any handsaw can achieve.
Where to Source Files and Guides for Your Ingco Handsaw
Getting your hands on the right files and guides makes the difference between a great result and a frustrating sharpening session.
Triangular files are your primary tool for sharpening both rip cut and crosscut saws. Small, affordable files let you start without expensive equipment.
Woodworking supply retailers carry specialised saw sharpening files suited for hand tools. Lee Valley offers Veritas Saw Sharpening guides and triangular files for precision work. Video tutorials cover step-by-step techniques for jointing, filing, and tooth set adjustments.
For bag stitching and closing applications, suppliers like Cool Pack cc stock industrial yarn and stitching machines that pair well with proper cutting tool maintenance.
Here’s what you’ll need to source:
- Triangular files for rip cut and crosscut sharpening
- A mill file for jointing teeth at 90 degrees
- Video tutorials demonstrating proper fleam angle positioning and tooth configuration assessment